Wave Function Collapse Level Generator


This is probably the most challenging project I’ve tackled. I was inspired by Oskar StÃ¥lberg’s work using the techniques from @ExUtumno‘s project (github.com/mxgmn/WaveFunctionCollapse). I wondered, could I do this too? As soon as I started, I was hooked. About 80% of the work was pipeline related. It would be prohibitively tedious to complete this project without things like “auto edge detection” and easy export/import + tile validation scripts. I ended up with about 60 tiles, built in Maya. The Ambient Occlusion is also a clever technique from Oskar StÃ¥lberg. It uses inside/outside data from the tiles to create a 3d texture.

My implementation includes backtracking, so if the algorithm hits a dead end it efficiently backs up to a valid state and continues down a new route. It also has “multi tiles”, which are set pieces that take up multiple tile spaces.

In the future, I want add the ability for the algorithm to solve in large spaces, even infinite spaces. I would do this by breaking the world into chunks, then solve each chunk using it’s neighbors edge data.

Rigging Test From 2011


A successful rigging test I did for Naughty Dog back in 2011. I was provided with only the mesh. With a nice base skeleton and some well place+rigged helper joints, I was able to get some nice results with the weighting.

Building NutrientCraft Webapp

NutrientCraft

Here is my web app, NutrientCraft.com

A couple of months ago I was inspired by Rob Rhinehart’s soylent experiment in which he claims to have stopped eating food by consuming only the ingredients the body requires. From his blog, “There are no meats, fruits, vegetables, or breads here… I researched every substance the body needs to survive.. and purchased all of them in nearly raw chemical form from a variety of sources.”

I like the idea of 100% efficiency, however Rob’s approach is too extreme for me. There is, for example, the possibility that nutritional science is incomplete or the that the production of the raw nutrients is flawed. I wanted something in between a traditionally healthy diet and a futuristic nutrient goo.
Continue reading Building NutrientCraft Webapp

Sublime Text 2 and Maya Setup Guide

sublime code intel


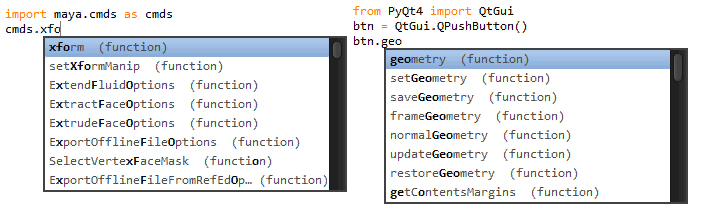
Sublime Text 2 is a really great text editor. If you haven’t tried it, do yourself a favor! Here is a guide to get you setup for Maya scripting. It includes auto complete for PyQt and maya.cmds/mel; and ctrl+enter communication with Maya. It took a bit of googling and fiddling to get this working, so hopefully I can save you some time and frustration.


1) First, get Sublime Text 2. It has an infinite trial period. If you like it, support it by buying it.


2) Get package control . Once its installed, press ctrl+shift+p in Sublime Text and start typing “package.” If you want, go to “Package Control:Discover Package” to browse the huge list of plugins.

 
3) UPDATE: I’m using Jedi now, its a much easier setup Here’s the github page, you can also install it through package control. Be sure to add to add ‘C:/Program Files/Autodesk/Maya[VERSION]/devkit/other/pymel/extras/completion/py/’ to the paths (see github for setup instructions)

3) Press ctrl+shift+p, start typing “package”, go to “Package Control:Install Package” and press enter. Now start typing “codeintel” and select “SublimeCodeIntel.” Let it install.


4) I had to remove some files from code intel to get it to work. The files were throwing errors so I just removed them and it worked. So go to “…\AppData\Roaming\Sublime Text 2\Packages\SublimeCodeIntel\libs\codeintel2” (You can easily navigate to this folder from Sublime Text 2 by selecting Preferences>Browse Packages) and take out “lang_css.py” and “lang_less.py” and their respective .pyc files.


5) Place pyqt4.cix in “…\AppData\Roaming\Sublime Text 2\Packages\SublimeCodeIntel\libs\codeintel2\catalogs” (You can easily navigate to this folder from Sublime Text 2 by selecting Preferences>Browse Packages). This .cix file is a catalog of pyqt for auto complete. I originally found it on wuub.net. In the version you can download here I changed one line to make it work. I edited the “name” attribute to the value “PyQt4”. All other cix files I found on the web didn’t work properly and using codeintel’s gencix.py utility created an incomplete cix. This does it right!


6) Navigate to “C:\Users\[WHATEVER]\Documents\.codeintel” and edit the config file to look like this (change the paths to fit your environment):
{
“Python”: {
“python”: ‘C:/Python26/python.exe’,
“pythonExtraPaths”: [
‘C:/Python26/Lib/site-packages’,
‘C:/Program Files/Autodesk/Maya2013/devkit/other/pymel/extras/completion/py/’
]
}
}

Note: The first time code intel tries to auto complete something, it will take a while. Especially the PyQt4.cix file. It may seem like its not working even after it completes loading, but try it a few times. Eventually if it really isn’t working, check out the log in “C:\Users\[WHATEVER]\Documents\.codeintel”


7)UPDATE: SublimeMaya is now in package control too. It shows proper stack trace and line number, so you can ignore this step. Now you need to get Sublime Text 2 to communicate with Maya. Get MayaSublime. In the plugin (which you can easily access from Sublime Text 2 via Preferences>Browse Packages), I edited the MayaSublime.py file so that it provides stack trace and the proper line number in the stack trace. You can download my version here. Thanks to Justin Israel for writing this. I also put cmds.commandPort(name=”:7002″, sourceType=”python”) in my userSetup.py script for convenience.


I hope this helps! If you have any additional things you’ve done with Sublime Text 2 to help with Maya development, let me know in the comments.


Maya Spotlight


I just started using sublime text, and I love the ability to quickly open files by pressing ctrl+p and typing in an auto complete text field. So fast! Mac os also has this with the spotlight feature. Here’s a version I wrote for Maya using PyQt. Just press ctrl+p and start typing. It will search a cached index of your project directory for all .ma/.mb files and auto complete. It prioritizes files that you open more often. It also detects files with versioning and puts the latest version on top. I use a QSplashScreen with a little transparency which I fit to the Maya main window to create a sexy overlay.

download here

Uify Widget – automatically layout 3d objections on a UI


Here’s a widget I create that layouts out 3d objects on a 2d QWidget. It allows you to quickly layout selected objects in a UI to use as buttons. It could be useful if you have a bunch of controls on a character and you need them organized quickly and on the fly. I used the M3dView to get the active viewport’s view and projection matrix and apply those to the 3d transforms to create 2d points. Then I remap the points into Qt’s coordinate system, turn them into rectangles, and apply some extra matrices (for panning and zooming) before they are drawn in a custom paint event.

Download the widget + an example here

Maya Minecraft Context

maya minecraft context

Play Minecraft in Maya! Just kidding. I’ve been playing Minecraft again lately and it inspired me to whip up a Maya script. It is a custom tool context using Maya Python API. With OpenMayaUI I grab the active view port using M3dView.active3dView(). I wrap the pointer to the active view port in a sip instance. With these two objects I can get the mouse pixel position with Qt and event filters, and then cast out a ray from that position into 3d space using M3dView .viewToWorld(). I use that ray in MFnMesh.closestIntersection() to get the point on the mesh and create a cube on the mesh surface. The result is an entirely scripted context that uses shift+click to place cubes on a mesh surface. There’s lots you can do with this if you edit the “create_block()” definition in my script to do whatever you want.

download the script here

Paint Processing Textures in Maya

This is a work in progress. It lets you paint cool 2d animated textures in Maya using processing. On OpenProcessing.org there are tons of amazing sketches that could can be used to create textures in Maya, so I wanted an easy interface to bridge the two technologies. It’s also an excuse for me to code an asynchronous image loader using python threading. I learned a lot reading through Nathan Horne’s Subsonic client open-source project.

You can use pretty much any sketch you find to create textures, you just need to edit some java if you want it to interface with this tool. Download the tool and put the directories in the correct place. Then Download processing . Find and download a sketch from OpenProcessing.org or create your own. Open the sketch in the processing IDE and click the “export applet” button. Put the .java file that is created by the export button into the MayaProcessingJava folder. You need add/edit a couple lines in the java file. First, set the Global.filepath variable in the main fuction. It should look like this:

  static public void main(String args[]) {
	Global.filepath = args[0];
    PApplet.main(new String[] { "--bgcolor=#F0F0F0", "doodle_3" });
  }
 

Then find the saveFrame() function and change it to saveFrame(Global.filepath). If there is no saveFrame() function, create it at the end of the draw function. Now you need to download JDK so you can use javac to compile .java files. You also need to install the processing libraries in java so the .java will compile, which is easy. Just navigate to program files/processing/lib and copy all those files to program files\Java\jdk[whatever version]\jre\lib\ext. I don’t know much about java so it is entirely possible this is bad practice, but it worked for me. Once that is done, open command line, navigate to MayaProcessingJava, and execute “javac theJavaFile.java”. If javac doesnt show up, make sure to add jdk/bin to your PATH environment variables so it can be accessed in command line. Now the maya tool will recognize the .class file in the MayaProcessingJava directory, and it will be accessible for painting in Maya!

download the wip tool here

Maya Timeline Markers

timeline_markers

This script lets you overlay markers on the timeline. Its useful if you need to set keys on different objects at certain times.
I created a QWidget with a custom paint event which renders a vertical line at a list of positions. Then I installed a couple event filters to create a shift+click context menu over the timeline. I couldn’t use the widget’s contextMenuEvent or mousePressEvent or else it would interfere with Maya’s context menus.

download the script here